Managing your ClickFunnels community effectively requires a robust set of admin tools to ensure content stays appropriate and engaging. With the admin moderation tools, you can handle posts, comments, and reports while fostering a safe, active environment. This article will walk you through how to manage posts, multimedia, and handle moderation tasks efficiently.

Requirements
An active ClickFunnels account
Administrator privileges in the community
Accessing Admin Tools
Go to the Community app from the left navigation menu.
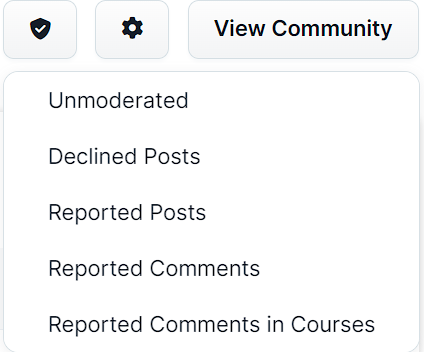
Click the Admin Shield icon at the top right of the page.
You’ll see options for:
Unmoderated: Content that hasn’t been approved yet and requires moderation.
Declined Posts: Posts that were rejected during moderation but can be revisited.
Reported Posts: Posts flagged by members as inappropriate.
Reported Comments: Comments flagged for review.
Reported Comments in Courses: Comments in course materials flagged for moderation.
.png)
Content Moderation Actions
Unmoderated Content
To manage content that requires admin approval:
Click Unmoderated.
Review the content awaiting approval.
Choose to either Approve or Decline each item.
Declined Posts
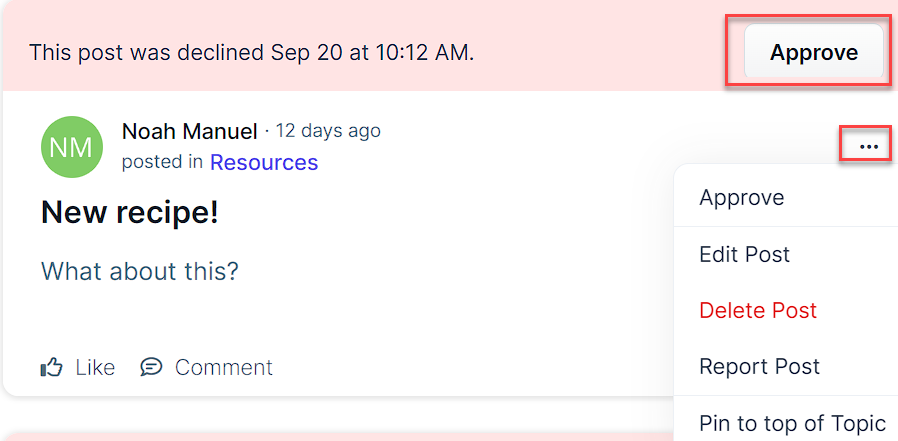
Declined posts are those that have been rejected during the moderation process but can be revisited for approval or further actions later.
Click Declined Posts from the Admin Shield.
Review the list of declined posts.
For each post, you can:
Click Approve to reinstate the post in the community.
Click the three-dot …icon to:
Edit Post: Modify the post before approving it.
Delete Post: Permanently remove it.
Report Post: Flag the post for inappropriate content.
Pin to top of Topic: Feature the post at the top of the topic feed for visibility.

Reported Content
To handle content flagged by community members:
Click Reported Posts, Reported Comments, or Reported Comments in Courses.
Review the reported content.
Click Dismiss Report to clear the report or Unapprove to remove the content from the community.
Managing Community Posts
Admins can control the visibility, placement, and SEO optimization of community posts. Here’s how to manage posts effectively:
Navigate to the Community app in the sidebar.
Select the Group where the post is located.
Choose the Topic where the post was added.
Find the post and click the gear ⚙️ icon next to it.
From the post settings menu, you can:
Edit Post: Modify the post title, body, or cover image.
Pin to Top of Topic: Pin the post so it remains at the top of the topic feed.
Change Attribution: Update the Contact attributed to the post by selecting a new member from the dropdown.
Change Topic: Move the post to another topic within the community by selecting a new topic from the dropdown.
Add or Edit SEO Metadata: Include an SEO-friendly Meta Title, Meta Description, and Meta Keywords to improve search engine visibility if the community or group is public. This is particularly useful for posts that need to be found outside of the community.
Click Update Post to save your changes, or scroll down and click Delete to remove the post.