ClickFunnels “Workflow” is a powerful tool that automates tasks based on specific events within your ClickFunnels workspace. Triggers can be set based on various user actions across the platform, such as purchasing a product, completing a course module, or opting in on one of your pages. Imagine you want to send a warm “thank you” email to every customer who completes a purchase. In this scenario, the trigger would be “Successful Purchase”, ensuring the email automatically goes out after someone finalizes their order on your funnel’s checkout page. Understanding and effectively utilizing these triggers can help you automate your marketing and follow-up processes efficiently.
This article will equip you with the knowledge to add, configure, and manage triggers effectively within your ClickFunnels workflows.

Requirements
An active ClickFunnels account
How to Add a Trigger in a Workflow
From your ClickFunnels dashboard, click on the Automations app in the left-hand menu.
Create a new workflow or access an existing workflow from the list.
Click on the No Trigger set to add your first trigger.
Click on + Add a trigger.
Add Trigger Criteria:
.png)
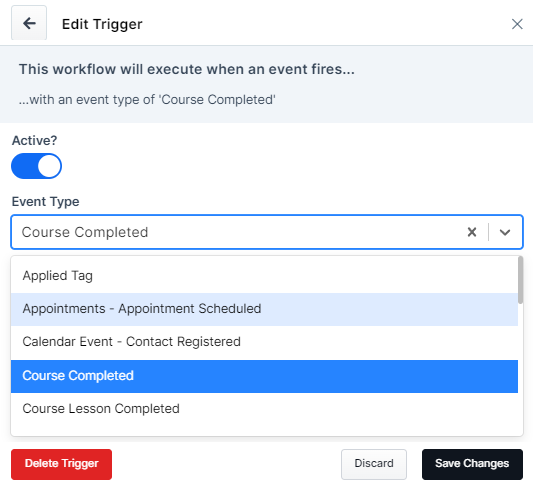
Activation: Toggle the Active switch to enable/disable the trigger.
Event Type: Select the specific event that will initiate the workflow. Examples include
Opt-In,Order - Successful Purchase,Applied Tagand more.Event Location: Select the source of the event such as funnel, course, or tag name depending on the event type you selected.
Allow Anonymous Contacts (Optional): Toggle this option if you want the workflow to run even for contacts without an email address. ClickFunnels requires that contacts have either an email address or a phone number. Contacts without an email address will be classified as anonymous.
Save Changes: Click the Save Changes button to add the trigger.
To add more triggers, click +Add a trigger and repeat the same process explained in step 5.
Supported Workflow Trigger Event Type
In ClickFunnels, workflow trigger event types are listed alphabetically. Use the search or scroll bar to find your desired event. Detailed explanations for each event type are provided below.
IMPORTANT
A workflow requires criteria, including an event type and event location, to be specified. If no criteria is selected, the workflow will execute for every event in your workspace. Be cautious when setting up your workflow to avoid unintended triggers.
Applied Tag
Trigger: This event type initiates the workflow when a specific tag is added to a contact’s profile. ClickFunnels allows assigning multiple tags to contacts, but this trigger can only target one tag at a time.
Select “Contact Tag”: The dropdown menu lets you choose the specific tag whose application will trigger the workflow.
Multiple Tags Scenario: If you need a workflow to activate when any of several tags are applied, create separate triggers within the same workflow, each specifying a relevant tag.
No Tag Selected: Leaving the “Contact Tag” option blank creates a universal trigger, initiating the workflow whenever any tag is applied to the contact’s profile.
Appointments - Appointment Scheduled
Trigger: This event activates the workflow when a customer schedules an appointment with you through your ClickFunnels Appointments app.
Calendar: Refine the trigger by selecting the specific calendar associated with the appointment scheduling.
Appointment Event Type: Choose a specific event type to further narrow down when the workflow triggers.
NOTE
Selecting a calendar without an appointment event type will trigger the workflow for all appointment types associated with that calendar.
Leaving both calendar and appointment event type selections blank will trigger the workflow for any appointment scheduled within your ClickFunnels workspace.
Calendar Event - Contact Registered
Trigger: This event activates the workflow when a customer registers for a calendar event within your ClickFunnels workspace.
Funnel: If the registration occurs through a specific ClickFunnels funnel, choose that funnel here for a targeted workflow.
Page: Similarly, select the specific landing page within the funnel where the registration happens.
Calendar Event: ClickFunnels allows the creation of different calendar events. Choose the specific event type the registration pertains to.
NOTE
The “Funnel”, “Page” and “Calendar Event” options can only be selected, if a calenar event is added to a funnel step.
Course Completed
Trigger: This event launches the workflow upon a customer completing a designated course within ClickFunnels.
Course: Select the specific ClickFunnels course completion that should trigger the workflow.
NOTE
Leaving the “Course” option blank creates a universal trigger, initiating the workflow whenever any course is completed in the workspace.
Course Enrolled
Trigger: This event activates the workflow when a customer enrolls in a specific course within your ClickFunnels workspace.
Course (Optional): Choose the specific course that should trigger the workflow when a customer enrolls.
NOTE
Leaving the “Course” field blank creates a universal trigger, meaning the workflow will initiate whenever any course enrollment occurs across your workspace.
Course Lesson Completed
Trigger: This event triggers the workflow when a customer finishes a specific lesson within a course.
Course: Choose the ClickFunnels course that contains the lesson.
Course Module: Select the specific module within the chosen course where the completed lesson resides.
Course Lesson: Pinpoint the exact lesson completion that should trigger the workflow.
NOTE
Selecting a specific Course and Module without choosing a particular Lesson will trigger the workflow whenever a customer completes any lesson within that module.
Leaving both Module and Lesson selections blank will initiate the workflow upon completion of any lesson within the chosen course.
Course Lesson Viewed
Trigger: This event activates the workflow when a customer views a specific lesson within a course in your ClickFunnels workspace.
Course (Optional): Choose the specific course that contains the lesson.
Course Module (Optional): Select the module where the lesson is located.
Course Lesson (Optional): Pinpoint the exact lesson that should trigger the workflow when viewed.
NOTE
Leaving all fields (Course, Module, and Lesson) blank creates a universal trigger, meaning the workflow will initiate whenever any lesson is viewed across any course in your workspace.
Course Module Completed
Trigger: This event activates the workflow upon completion of a particular module within a ClickFunnels course.
Course: Select the specific ClickFunnels course that contains the module.
Module: Choose the specific module within the course whose completion should trigger the workflow.
NOTE
Leaving both Module selections blank will initiate the workflow upon completion of any module within the chosen course.
Email Broadcast - Click
Trigger: This event activates the workflow when a contact clicks on a link within an email broadcast sent through ClickFunnels.
Broadcast Select the specific email broadcast that you want to monitor for link clicks. Leaving this blank will apply the trigger for any email broadcast click event.
Email Broadcast - Open
Trigger: This event initiates the workflow when a contact opens an email broadcast sent through ClickFunnels.
Broadcast Choose the specific email broadcast for tracking open events. Leaving this field blank will apply the trigger for any email broadcast open event.
Email Broadcast - Sent
Trigger: This event activates the workflow when an email broadcast is sent to a contact.
Broadcast Specify the email broadcast to monitor for send events. Leaving this option blank will apply the trigger for any email broadcast sent event.
MessageHub - Agent Conversation Started
Trigger: This event initiates the workflow when an agent working within your ClickFunnels account initiates a conversation with a contact through MessageHub.
Inbox (Optional): ClickFunnels allows you to set up multiple inboxes for categorizing conversations. Selecting a specific inbox here refines the trigger to only activate the workflow for conversations initiated by agents within that particular inbox.
MessageHub - Agent Responded
Trigger: This event activates a workflow when an agent working within your ClickFunnels account replies to a message within an existing conversation on MessageHub.
Inbox (Optional): ClickFunnels allows you to create multiple inboxes for organizing conversations. Selecting a specific inbox here refines the trigger to only activate the workflow for agent replies within that particular inbox.
MessageHub - Contact Conversation Started
Trigger: This event activates a workflow when a contact initiates a conversation with an agent within ClickFunnels MessageHub.
Inbox (Optional): ClickFunnels allows you to set up multiple inboxes for categorizing conversations. Selecting a specific inbox here refines the trigger to only activate the workflow for conversations initiated by contacts within that particular inbox.
MessageHub - Contact Responded
Trigger: This event initiates a workflow when a contact replies to an existing conversation within ClickFunnels MessageHub.
Inbox (Optional): ClickFunnels allows you to create multiple inboxes for organizing conversations. Selecting a specific inbox here refines the trigger to only activate the workflow for contact replies within that particular inbox.
Opt-In
Trigger: This event launches a workflow whenever a contact opts into your ClickFunnels account through an opt-in form.
Funnel (Optional): If the opt-in occurs within a specific ClickFunnels funnel, you can choose that funnel here to create a more targeted workflow.
Page (Optional): Similarly, you can select the specific landing page or opt-in form within the chosen funnel where the opt-in happened.
NOTE
If you have chosen a specific funnel, only the pages within that funnel will be displayed.
If you leave the funnel selection blank, all pages in your workspace, including landing pages, site pages, and funnel pages, will be shown.
Leaving the page field blank applies the trigger to all pages within your workspace.
Order - Successful Purchase
Trigger: This event activates a workflow whenever a customer completes a successful purchase within your ClickFunnels account. This encompasses any scenario where a customer finalizes a one-time product purchase, subscription signup, or any other order completion process.
Funnel (Optional): You can choose a specific funnel within your ClickFunnels workspace to refine the trigger. This allows you to create workflows that target successful purchases made within a particular funnel.
Page (Optional): Selecting a specific page within the chosen funnel further narrows down the trigger. This enables workflows to focus on purchases initiated from a particular checkout page within the funnel.
Product (Optional): The ClickFunnels checkout page supports multiple products. ClickFunnels allows you to specify a specific product within the checkout page to trigger the workflow only for successful purchases of that particular product.
Product Variant (Optional): If your product has variants (e.g., different sizes, and colors), you can select a specific variant to trigger the workflow only for purchases of that variant. This provides the most granular control over the successful purchase event.
NOTE
Leaving “Funnel” option blank will trigger the workflow for successful purchases made within any funnel in your ClickFunnels workspace. This is useful for capturing all successful purchases regardless of the specific sales funnel.
Selecting a specific product while leaving both Funnel and Page options blank, will initiate the workflow for successful purchases of that exact product anywhere within your ClickFunnels workspace.
Leaving “Product” option blank will trigger the workflow for successful purchases of any product in your workspace.
Selecting a product without a variant (If available) will run the workflow when there is successfull purchase of every variant in the product.
Pageview
Trigger: This event launches a workflow whenever a visitor views a specific page within your ClickFunnels workspace.
Funnel (Optional): If the pageview occurs within a specific ClickFunnels funnel, you can choose that funnel here to create a more targeted workflow.
Page (Required): You can select the specific page within your ClickFunnels workspace that triggers the workflow.
NOTE
Leaving both Funnel and Page fields blank within the “Pageview” trigger functions as a universal selection. This initiates the workflow whenever a visitor views any page within your ClickFunnels workspace.
Removed Tag
Trigger: This event activates a workflow whenever a specific tag is removed from a contact’s profile within your ClickFunnels workspace.
Contact Tag: The dropdown menu lets you choose the specific tag whose removal triggers the workflow.
WARNING
Leaving the “Contact Tag” option blank in the “Removed Tag” event will trigger the workflow for any tag removal. However, this might also trigger the workflow for unintended tag removals caused by mistakes or data cleanup. To avoid this, consider selecting a specific tag from the dropdown menu.
Sales - Contact Entered Stage
Trigger: This event activates a workflow whenever a customer enters a specific stage within your ClickFunnels sales pipeline, managed through the Opportunities app. A sales pipeline visually represents the journey of your leads as they progress toward becoming customers. ClickFunnels allows you to create custom pipelines with different stages to model your specific sales process.
Pipeline (Optional): Choose the specific sales pipeline from the Opportunities app that you want to monitor. Selecting a pipeline will populate a dropdown menu for selecting the desired stage within that pipeline.
Stage (Optional): Once you select a pipeline (if desired), you must choose the specific stage within that pipeline that triggers the workflow otherwise, leaving this field blank will activate the workflow for any contact entering any stage with the selected pipeline.
Sales- Contact Exited Stage
Trigger: This event activates a workflow whenever a customer exits a specific stage within your ClickFunnels sales pipeline, managed through the Opportunities app.
Pipeline (Optional): Choose the specific sales pipeline from the Opportunities app that you want to monitor.
Stage (Optional): Once you select a pipeline, it will allow you to select the specific stage within that pipeline that triggers the workflow when a contact exits it.
Send Email Step - Click
Trigger: This event activates the workflow when a contact clicks on a link within an email step in a workflow sequence.
Workflow Step: Select the specific email step within the workflow sequence that you want to monitor for link clicks. Leaving this blank will apply the trigger for click event for any email step of all active workflows.
Send Email Step - Open
Trigger: This event initiates the workflow when a contact opens an email step in a workflow sequence.
Workflow Step: Choose the specific email step to track open events. Leaving this blank will apply the trigger for open event for any email step of all active workflows.
Send Email Step - Sent
Trigger: This event activates the workflow when an email step in a workflow sequence is sent to a contact.
Workflow Step: Specify the email step to monitor for send events. Leaving this blank will apply the trigger for sent event for any email step of all active workflows.
Subscription - Cancelled
Trigger: This event activates a workflow whenever a customer cancels a subscription within your ClickFunnels workspace.
Subscription Cancellation Reason: This allows you to tailor workflows based on the specific reasons customers provide for canceling their subscriptions.
Specific Subscription: This lets you create workflows targeted towards cancellations of a particular product subscription within your workspace.
NOTE
Leaving the “Subscription Cancellation Reason” field blank triggers the workflow for all cancellation reasons.
Leaving the “Specific Subscription” field blank will run the workflow for cancellations of any product subscription price in your workspace.
Subscription - Churned
Trigger: This event activates a workflow whenever a customer’s subscription fully terminates within your ClickFunnels workspace. Churned refers to the point where a customer’s access to the subscribed product is completely revoked. This happens when the customer’s subscription has ended, meaning the next payment date has passed without renewal, and the customer no longer has access to the product subscription. Unlike a subscription cancellation, where the customer may still have access until the end of their billing cycle, a churned subscription indicates that the service has entirely ceased.
Subscription (Optional): This dropdown menu allows you to select a specific subscription product within your workspace. By selecting a particular subscription, the workflow will only be triggered when a churn event occurs for that specific subscription. Leaving this field blank will trigger the workflow for churn events associated with any subscription product in the workspace.
Variant (Optional): If your subscription product includes different variants, you can specify a variant to further narrow down the trigger. This is useful if you want the workflow to activate only when a customer churns from a specific variant of the subscription product.
NOTE
Leaving both the “Subscription” and “Variant” fields blank creates a universal trigger, meaning the workflow will initiate whenever any subscription churns within your workspace, regardless of the specific product or variant.
Subscription - Downgraded
Trigger: This event activates a workflow whenever a customer downgrades their existing subscription plan within your ClickFunnels workspace. Downgrading refers to a customer changing their subscription to a plan with fewer features or a lower price point.
Subscription (Optional): This dropdown menu allows you to select a specific subscription product within your workspace. Leaving this field blank will trigger the workflow for downgrades of any subscription product.
Subscription - Recurring Payment Declined
Trigger: This event activates a workflow whenever a customer’s recurring payment for a subscription within your ClickFunnels workspace is declined. A declined payment can occur due to various reasons, such as insufficient funds, expired credit cards, or other payment processing issues.
Subscription (Optional): This dropdown menu allows you to select a specific subscription product within your workspace. Leaving this field blank will trigger the workflow for declined payments on any subscription product in the workspace.
Subscription - Upgraded
Trigger: This event activates a workflow whenever a customer upgrades their subscription plan within your ClickFunnels workspace. An upgrade refers to a customer changing their subscription to a plan with more features or a higher price point.
Subscription (Optional): This dropdown menu allows you to select a specific subscription product within your workspace. Leaving this field blank will trigger the workflow for upgrades of any subscription product.
Survey Completed
Trigger: This event activates the workflow when a visitor completes a survey form you’ve created in the “Survey Workflows” app.
Survey (Optional): Refine the trigger by selecting the specific survey form you want to track completions for. Leaving this blank will trigger the workflow for any completed survey.
Updating a Trigger
Navigate to Automations and select Workflows to access your existing workflows.
Click on the Workflow Trigger step at the top of your workflow.
Click the Pencil icon next to the trigger you want to update.

Modify the Trigger Settings as required to meet your needs.
Click the Save Changes button to apply your updates.
Deleting a Trigger
Navigate to Automations and select Workflows to access your existing workflows.
Click on the Workflow Trigger step at the top of your workflow.
Click the Pencil icon next to the trigger you want to delete.
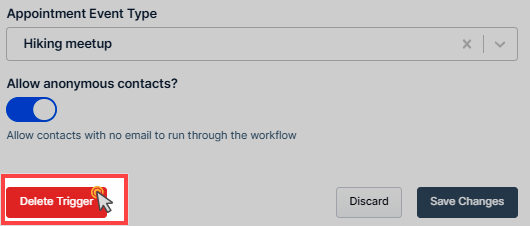
Click the Delete Trigger button.

Alternative Method: Removing from Funnel Step (if applicable):
ClickFunnels also allows you to remove triggers directly from specific funnel steps (if your trigger is associated with a funnel).
Access to the funnel from the Funnels menu in your workspace.
Find the funnel step where the trigger is currently connected.
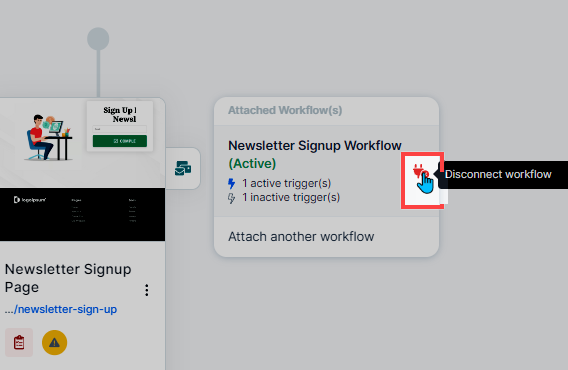
Click on the red unplug icon next to the desired funnel step. This will remove the trigger from the workflow.

WARNING
Deleting a trigger is permanent and cannot be undone. Before deleting, ensure you understand the impact on your workflow’s functionality.
Activating / Deactivating a Trigger
ClickFunnels workflows allow you to create multiple triggers that initiate the workflow automation. However, you might not always need all triggers to be active simultaneously. Here’s how to enable or disable triggers within your workflows:
Navigate to Automations and select Workflows to access your existing workflows.
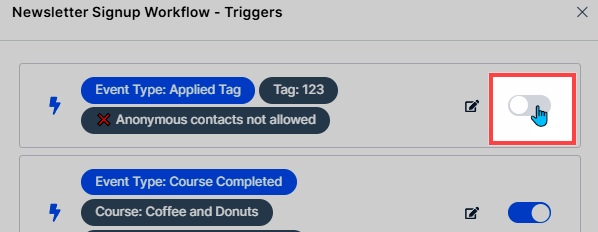
Click on the Workflow Trigger step at the top of your workflow. This displays the list of triggers associated with the workflow.
Locate the trigger you want to manage and click the toggle switch next to it. A blue toggle indicates the trigger is active, while a gray toggle indicates it’s inactive.
