Sales tax is a government-imposed fee on the sale of goods and services, calculated as a percentage of the selling price. Businesses must collect sales tax to comply with legal requirements and ensure proper revenue collection for public services. For instance, if a state has a 6% sales tax rate, a product priced at $100 would incur an additional $6 in sales tax, making the total cost to the customer $106. ClickFunnels offers robust features to enable sales tax collection on your products, ensuring compliance while streamlining the checkout process.
In this article, you will learn how to prepare your Payment AI for tax calculations and enable sales tax on your ClickFunnels products. 
IMPORTANT
The sales tax feature in ClickFunnels, facilitated through Payment AI, is currently only available for US merchants. Only US taxes are supported at this time.
ClickFunnels does not offer advice or guidance on whether you should collect sales tax for your business or product. It is recommended to seek assistance from a qualified tax expert or advisor to ensure compliance with your tax obligations.
Requirements
An active ClickFunnels account
Prepare Your Payments AI for Sales Tax Collection
Before enabling sales tax on your products in ClickFunnels, configure your Payments AI to handle tax calculations. You can accomplish this by either setting tax locations within Payment AI or integrating TaxJar.
Set Taxable Locations in Payments AI:
Setting tax locations in Payments AI ensures that the correct tax rate is applied for your designated sales region. This involves specifying the country, state, and any other relevant details where your sales are subject to tax. This allows ClickFunnels to apply the appropriate tax rate.
NOTE
If you integrate TaxJar with Payments AI, setting tax locations is not necessary
Integrate TaxJar with Payments AI:
Optionally, you can integrate TaxJar with Payments AI for enhanced tax-related capabilities. This integration offers additional functionality to streamline tax processes and improve compliance.
For detailed instructions on configuring these features, please refer to the documentation provided by Payments AI.
How to Enable Sales Tax In ClickFunnels Product
Navigate to the Products section in the left-side navigation menu.
Locate your desired product on the right-hand side. To access its settings, click on the product itself, its image, or the settings icon (⚙).
Scroll down to the Pricing section.
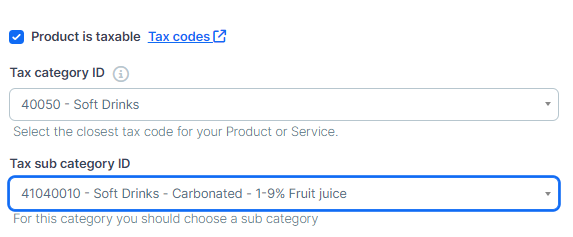
Check the box Product is taxable.

Choose the appropriate tax category ID from the Tax Category ID field. You can find detailed information on tax codes, categories, and descriptions in the TaxJar documentation.
If your selected category requires a sub-category, choose the appropriate sub-category ID from the Tax Sub Category ID field.
Click Update Product to save your changes.
Displaying Sales Tax on the Checkout Page
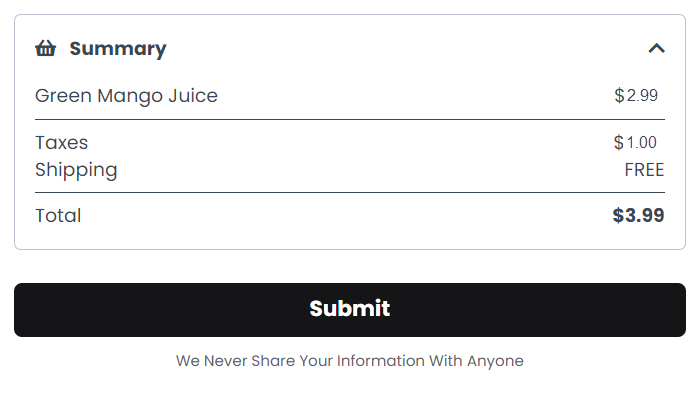
When you designate a product as taxable in ClickFunnels, the platform automatically calculates and presents the sales tax during the checkout process. To ensure this, you need to add a checkout element to your page, which manages the order summary, including the calculation and display of sales tax. Once the customer enters their billing address during checkout, ClickFunnels uses this information to determine the applicable sales tax rate based on configured settings and then displays it in the order summary section. Here’s how it works:
Customer Adds Product to Cart: The customer selects a product to purchase, which has been set as taxable in your product settings.
Customer Enters Billing Address: The customer fills out their billing address in the checkout form.
Sales Tax Calculation: After the billing address is entered, ClickFunnels calculates the sales tax based on the tax settings in Payment AI.
Order Summary Update: The order summary section on the checkout page updates to reflect the calculated taxes. The “Taxes” field in the order summary will display the applicable sales tax amount.
