The “Split Test” step in ClickFunnels workflows is a powerful tool that allows you to perform A/B testing within your automated sequences. This step helps you compare different versions of a message or action by splitting your audience into two or more paths. By testing different variations, you can optimize your campaigns to determine which version yields the best results. In this article, we will guide you through setting up the “Split Test” step, configuring the traffic distribution, and analyzing the outcomes.

Adding the “Split Test” Step to Your Workflow
Open Your Workflow:
From your ClickFunnels dashboard, navigate to the Automations » Workflows menu.
Open an existing workflow or create a new one.
Add the “Split Test” Step:
Click on the Plus Icon (+) in your workflow editor.
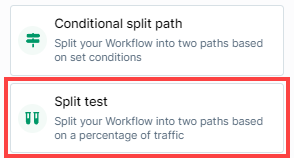
In the right-hand panel, select the “Split Test” option under the “Workflow” category.

Configuring the “Split Test” Step
Once you’ve added the “Split Test” step, it’s time to configure how your audience will be divided:
Traffic Distribution:
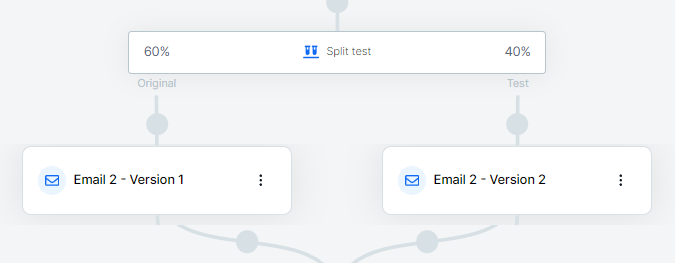
The “Split Test” step allows you to decide what percentage of your audience will follow each path. By default, the traffic is split 50/50, but you can adjust this by clicking on the percentage slider and moving it to your desired distribution. For example, you might want to send 60% of your traffic to the original path and 40% to the test path.

Configure Actions in Each Path:
Next, you’ll need to set up the actions or messages for each path. For instance, you might send two different versions of an email or offer different products to each group.

Analyzing Split Test Results
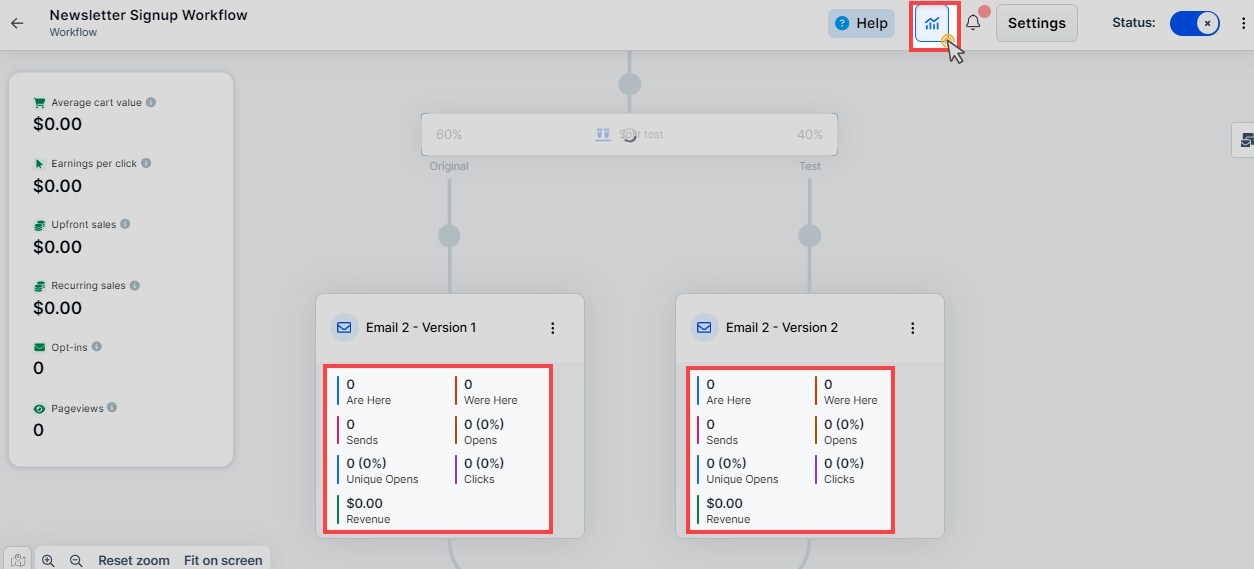
To evaluate the effectiveness of your split test, you can access and analyze detailed performance metrics within your workflow. Ensure the analytics icon in the workflow is activated; if it’s not, click on it to enable the analytics display.

Once activated, you can monitor key metrics for each path, such as open rates, click-through rates, and revenue generated. For instance, if you’re split testing different email versions, these metrics will help you determine which version resonates more with your audience. By regularly reviewing these insights, you can make informed, data-driven decisions to optimize your future campaigns.
Practical Use Cases
Email Subject Line Testing: Split test different email subject lines to see which one results in higher open rates.
Offer Testing: Test different offers or products to determine which one converts better.
Content Variation: Compare two versions of an email step to find out which design resonates more with your audience.
How to Safely Remove The “Split Test” Path
Removing a Split Test path from your workflow in ClickFunnels is straightforward, but it’s crucial to proceed carefully, as this action cannot be undone. Follow these steps to safely remove the Split Test path:
In your workflow, hover over the Split Test step that you want to remove. A red cross icon will appear next to the split test.
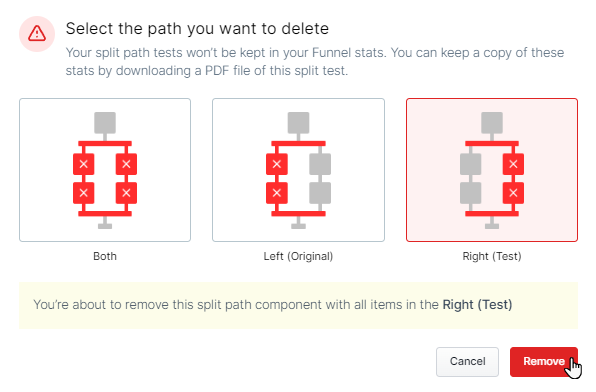
Click on the red cross icon. A prompt will appear, offering you three options:

Select the Path to Remove:

Left (Original) Path: Choosing this option will remove the Split Test step and all steps within the Original path. The steps in the Test path will remain in the workflow without any split testing applied.
Right (Test) Path: Choosing this option will remove the Split Test step and all steps within the Test path. The steps in the Original path will remain in the workflow without any split testing applied.
Both Paths: This option will remove the Split Test step along with all the steps within both the Original and Test paths.
After selecting the path(s) you want to remove, click the Remove button to confirm your choice. Once a path is deleted, both the steps within that path and the Split Test step itself will be permanently removed from your workflow.
WARNING
Deleting a path and the associated “Split Test” step is a permanent action. Ensure you have carefully reviewed the steps within each path before deciding to remove them, as this decision cannot be reversed.