Universal sections, rows, and elements in ClickFunnels let you create reusable design components that automatically update across multiple pages. By using universal items, you can design elements like headers, footers, or banners once and apply them consistently throughout your pages. In this article, you’ll learn how to create, manage, and use Universal sections, rows, and elements across your pages.

Requirements
An active ClickFunnels account.
A page created in your workspace.
Overview of Universal Sections
Universal sections, rows, and elements are powerful tools in ClickFunnels that allow you to create reusable design components for your funnel pages. These universal items are ideal for content you want to appear consistently across multiple pages—such as headers, footers, promotional banners, or calls to action.
When you save an item as universal, any updates you make to it will automatically apply to every instance where it’s used. This feature saves time by eliminating the need to make individual updates on each page, while also ensuring a consistent look and feel across your funnels. Universal sections, rows, and elements are especially valuable for maintaining brand identity, streamlining workflows, and creating a seamless user experience.
How to Add Universal Sections, Rows, and Elements
Open the page editor for the page where you want to add a universal item.
Click the Add Section, Add Row, or Add Element button in the editor, depending on which type of universal item you wish to add.
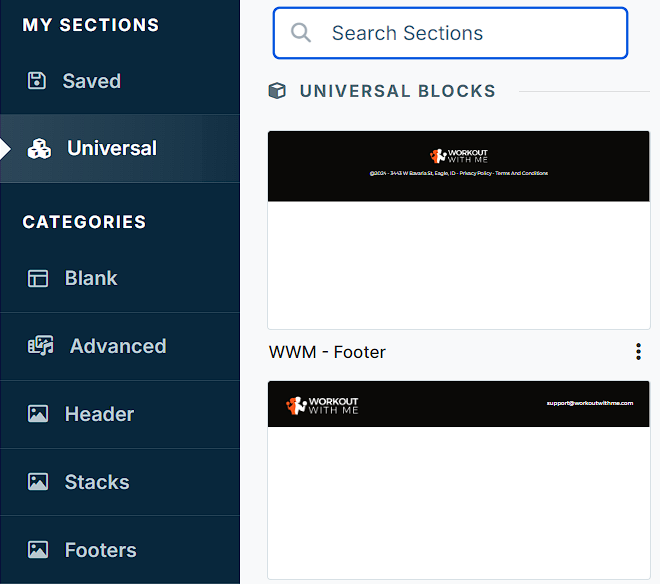
Select Universal from the left-hand menu.
Browse through your saved Universal Blocks to find the universal section you previously created.
Click the section to add it to your page.
.png)
Saving Sections, Rows, and Elements as Universal
To make an item universal, follow the standard process for saving sections, rows, or elements, and select the Make Universal option. This ensures that any updates you make to the saved item will automatically apply across all pages where it’s used, helping you maintain a consistent design across your funnel.
For step-by-step instructions on saving blocks, see our How to Save and Import Sections, Rows, and Elements article.
Quick Guide to Saving Universal Blocks
Sections: Hover over the section, click Save, name it, and check Make section Universal.
Rows: Hover over the row, click Save, name it, and check Make row Universal.
Elements: Hover over the element, click Save, name it, and check Make element Universal.
Configuring Universal Blocks Settings
Accessing Settings
In the page editor, select the Universal Block you want to customize.
Click the gear ⚙️ icon to open the settings panel.
Top Margin
The Top Margin setting allows you to control the space between the current element and the element directly above it. If no previous element exists, the margin will be applied relative to the parent container, such as a row, section, or flex container. You can adjust the margin using the slider or manually input a value (px or percentage %), ensuring the spacing is consistent with your design needs.
Edit Universal Block
The Edit Universal Block option allows you to make global changes to the content and layout of the section. Changes made here will automatically apply across all pages where this Universal Section is used.
After making edits, click Save Universal Block to apply updates across all pages. Select Discard Changes if you want to revert any unsaved edits.
.png)
Unlink Universal Block
The Unlink Universal Block option detaches the section from the Universal setting, making it unique to the current page. This allows for custom edits without impacting other pages.
.png)
Advanced Settings
To further customize your container (section, row, column, and element), ClickFunnels provides powerful Advanced settings options that allow you to control style, advanced CSS, animation, and rendering logic. We’ve separated these advanced features into dedicated articles to avoid overwhelming you with too much content in one place and to keep our documentation concise. Explore the following resources for more details:
Advanced Settings - Customize Styles: Learn how to populate contents dynamically, position containers, and apply z-index.
Advanced Settings - Customize Animation: Learn how to add animations, control entry and exit effects, and adjust animation delay.
Advanced Settings - Customize Logic: Learn how to apply conditional logic to elements and add custom attributes.
Managing Universal Sections, Rows, and Elements
You can manage your universal sections, rows, and elements from the page editor. This allows you to organize, rename, edit, or delete saved items as needed.
In the page editor, click Add Section, Add Row, or Add Element, depending on the type of universal block you want to manage.
Select Universal from the side menu to view all your saved Universal Sections.
Find the block you want to manage and click the three dots next to its thumbnail.
Choose an option from the dropdown:
Rename: Edit the name and click Update to save changes.
Edit: Open the item to make changes. Edits will automatically apply to all pages where the item is used.
Delete: Click Delete to remove the item from your universal blocks. Confirm the deletion when prompted.
.png)