ClickFunnels webhooks provide a way to transfer data from ClickFunnels to another platform via a webhook URL that can receive data. Essentially, ClickFunnels makes a POST request to the specified URL whenever a specified event occurs. This article will guide you through the process of creating and managing webhooks in ClickFunnels.

Requirements
An active ClickFunnels account.
An external webhook endpoint URL that is properly configured to handle incoming POST requests.
Sufficient knowledge of webhooks and APIs, or take assistance from a qualified developer to set up and troubleshoot webhooks effectively.
Overview of ClickFunnels Webhooks
A ClickFunnels webhook is a feature that allows data to be sent from ClickFunnels to an external service in real-time when specific events occur. This is particularly useful for integrating ClickFunnels with other platforms and automating workflows. Webhooks offer an excellent alternative to ClickFunnels’ existing direct integrations, providing flexibility to connect with platforms that do not have a native integration. This ensures that users can maintain efficient and automated data flow regardless of the external service being used.
Creating a New Webhook
To create a webhook in ClickFunnels, follow these steps:
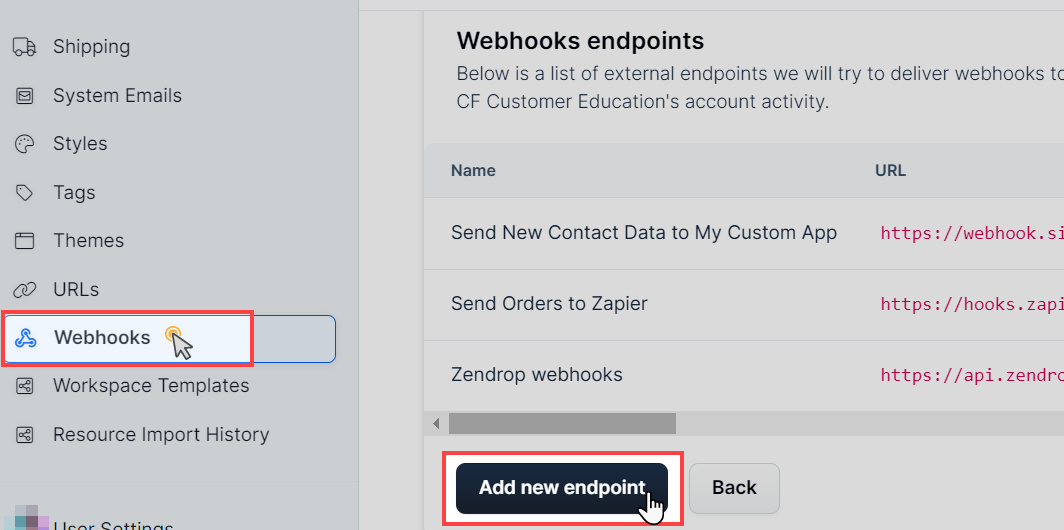
Navigate to Workspace Settings in the left side navigation.
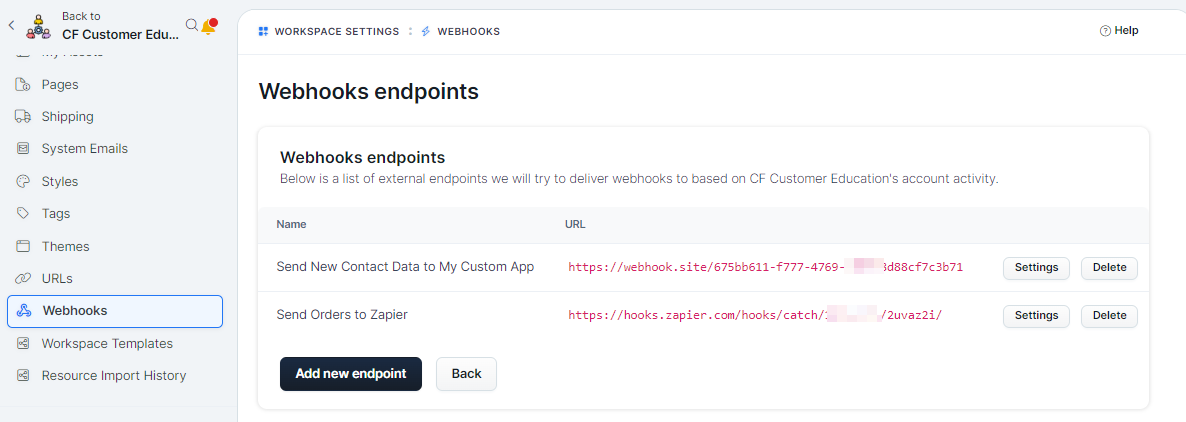
Select Webhooks menu in the “Workspace Settings.”
Click on the Add New Endpoint button.

Enter a Name for your webhook, such as “Send Orders to Shopify”.
In the URL field, enter the endpoint URL of the application or API you want to send data to.
In the Event Types field, select the events that you want to trigger the webhook. Examples include
contact.createdandorder.completed.For a complete list of event types, refer to the API documentation Webhook Event Types.
In the API Version field, select an API version.
NOTE
The use of V1 webhooks is discouraged as they only receive maintenance support and are not being further developed. New webhooks are typically V2-only, so it is recommended to choose V2 whenever possible.
Specify the Endpoint Scopes (Optional): In the Endpoint Scopes section, you can limit the webhook to specific funnels and pages. This is useful if you only want the webhook to be triggered by events occurring in certain parts of your ClickFunnels setup.

IMPORTANT
Endpoint scopes are limited to certain events. Not all events are supported within this scope. You can mix pages and funnels, but ensure the event types you select are eligible. Click the information icon next to the Endpoint Scopes section for a list of supported events.
Click the Create endpoint button to save your new webhook.
Viewing Webhook Deliveries
To view webhook deliveries in ClickFunnels, follow these steps:
Go to the Webhooks menu in your “Workspace Settings”.
Select the specific webhook you want to view.
Scroll down to view the Deliveries section. The “Deliveries” table will display all the delivery attempts.
Click the Details button next to an entry to view more details. This will show you the delivery status, attempt timestamps, and response codes.

Modifying an Existing Webhook
To modify an existing webhook in ClickFunnels, follow these steps:
Go to the Webhooks menu in your “Workspace Settings”.
Click the Settings button next to the webhook you wish to edit.

Update the name, URL, event types, and endpoint scopes as needed.
Click Update Endpoint to save your changes.
Deleting a Webhook
To delete a webhook in ClickFunnels, follow these steps:
Navigate to the Webhooks section in the workspace settings.
Click the Delete button next to the webhook you wish to remove.

In the prompt that appears, click Proceed to confirm the deletion .
WARNING
Deleting a webhook is permanent and cannot be undone. All existing delivery logs associated with the webhook will be removed. Take caution and ensure you are deleting the correct webhook.
Troubleshooting a Webhook
Effective troubleshooting of webhooks is crucial to ensure they function correctly and transmit the intended data without errors. Here are some steps and best practices to help you troubleshoot a webhook in ClickFunnels:
View Delivery Details:
Start by reviewing the delivery details within ClickFunnels. Navigate to the Webhooks section in your workspace settings, select the specific webhook, and check the deliveries table. Click the “Details” button next to an entry to see detailed information about the delivery status, attempt timestamps, and response codes. This can help you identify if there are any immediate issues with the webhook deliveries.
Use a Webhook Testing Site:
To further test and troubleshoot your webhook, you can use a webhook testing service like webhook.site. This service allows you to create a temporary webhook URL that you can use to test your ClickFunnels webhook.
Go to webhook.site and generate a unique URL.
Replace the URL in your ClickFunnels webhook settings with the webhook.site URL.
Perform the actions in ClickFunnels that you expect to trigger the webhook (e.g., completing an order, deleting a contact).
Return to webhook.site to inspect the data that was sent to the testing URL. This will show you exactly what data is being transmitted and help you identify any discrepancies or issues.
Verify Event Types and Scopes:
Ensure that the event types selected in your webhook settings are appropriate for the actions you are testing. Double-check the endpoint scopes to confirm that the webhook is set to trigger for the correct funnels and pages.
If necessary, adjust the event types and scopes to better match the specific events you want to monitor and test again using the webhook testing site.
Check API Version Compatibility:
Make sure you are using the correct API version (preferably V2) as V1 webhooks are deprecated and might not support all features or events.
Confirm that the external platform or service you are integrating with also supports the version you are using.
Analyze Response Codes:
Pay attention to the response codes received during webhook delivery attempts. Common HTTP response codes such as 200 (OK), 400 (Bad Request), 401 (Unauthorized), and 500 (Internal Server Error) can provide insights into potential issues.
For example, a 400 error may indicate a problem with the data format, while a 401 error suggests an authentication issue.
Consult Documentation and Support:
Refer to ClickFunnels’ API documentation and support resources for additional guidance and troubleshooting tips. The API Documentation provides comprehensive details about webhook event types, parameters, and best practices.
If you encounter persistent issues, consider reaching out to ClickFunnels support for further assistance. To receive a faster and more accurate response, provide as much information as possible. Include images, screen recordings, data logs, or any other relevant details that can help the support team analyze and understand the issue more effectively.
By following these steps and utilizing available tools and resources, you can effectively troubleshoot and resolve issues with your ClickFunnels webhooks, ensuring seamless integration and data flow with your external systems.
ClickFunnels Webhooks FAQs
Which ClickFunnels plans support webhooks?
All ClickFunnels plans support webhooks.
How many webhooks can I create?
There is no limitation on the number of webhooks you can create.
What is the payload type of the webhook?
The payload type of the webhook is JSON.
Can I view and copy the deliveries of each event?
Yes, you can view and copy the deliveries of each event. Navigate to the Webhooks section in your workspace settings, select the specific webhook, and click on the Details button next to the delivery entry to access and copy the information.
Can a webhook send data for multiple events?
Yes, a single webhook can be configured to trigger for multiple events. You can select multiple events in the “Event Types” field inside the webhook settings.
I want to use a webhook for events in a specific funnel or page. Is it possible?
Yes, you can use “Endpoint Scopes” to select specific funnels and pages for your webhook. This allows the webhook to be triggered only by events occurring within the specified scopes. You can configure these settings in the Endpoint Scopes section when creating or editing your webhook.