Customizing Style Shadows in ClickFunnels is a simple way to add depth and make your funnels more engaging. Adjusting shadows helps highlight important elements, creating a polished and professional look. The best part is that any changes you make to the shadows will automatically update across all funnels that use that style, ensuring consistency and saving you time. This article will walk you through the steps to customize style shadows in ClickFunnels, helping you enhance the overall appearance of your funnels with ease.

Requirements
An active ClickFunnels 2.0 account
Accessing Style Shadows
Click on Workspace Settings at the bottom left of your ClickFunnels dashboard.
Scroll down the menu on the left and click on the Styles tab.
Find the style you want to edit and click on the Customize Design
.png) icon to the right of it.
icon to the right of it.In the left menu, click on Shadows to access and edit the style’s shadow settings.
Customizing Shadow Settings
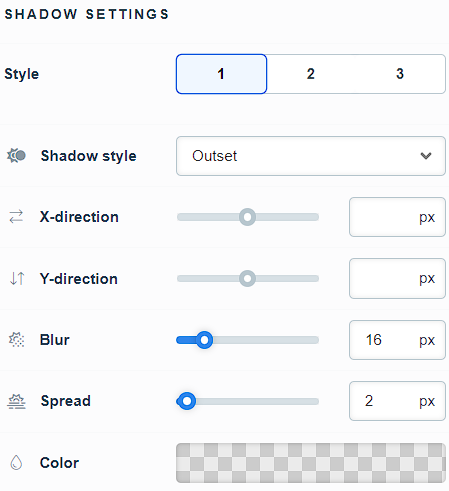
There are Three Styles available. Select the style you want to customize.

Choose the Shadow Style from the drop-down menu, selecting either Outset or Inset.
Adjust the X-direction and Y-direction for the shadow using the slider or by entering a pixel number.
Set the Blur level to determine how soft or sharp the shadow edges will appear.
Adjust the Spread to control how far the shadow extends from the element. Higher values make the shadow larger.
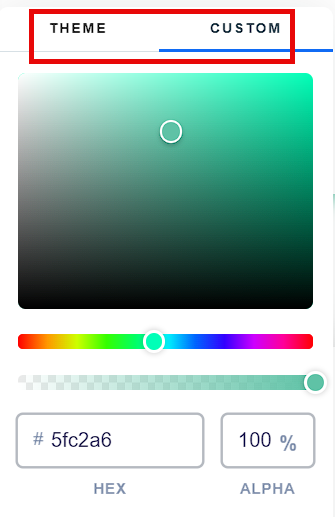
Click on the Color box to open the color palette and choose a color using one of these methods:
Move the custom color slider and drag the hand icon on the color palette to select your desired color. Use the transparency slider to adjust the color’s opacity.
Enter the HEX code for a specific color and adjust the opacity percentage using the box next to the HEX code.
Alternatively, switch to the Theme tab to choose a color that matches your theme.

(Optional) If you want to customize additional shadow styles, repeat the steps above for each style.
Click Update to save your changes.