The Add to Cart functionality in ClickFunnels allows customers to add multiple products to a cart before proceeding to checkout. This feature enhances the shopping experience by enabling users to review their cart, update quantities, and complete their purchase in a simple process. In this article, you’ll learn how to set up and customize the Add to Cart feature in your ClickFunnels Store.
Requirements
An active ClickFunnels account
At least one created product
Overview of the Add to Cart Feature
The Add to Cart functionality allows your customers to add multiple products to their cart as they shop, giving them the flexibility to browse and manage their items before completing their purchase. This feature enhances the shopping experience by simplifying the checkout process and providing customization options to match your store’s design.
Key Benefits of the Add to Cart Feature:
Improved Shopping Flow: Customers can browse your store freely, adding products to their cart without being forced to check out immediately.
Increased Order Value: By allowing customers to review and add multiple items before checking out, the cart can encourage larger purchases.
Simplified Checkout: A single-step checkout process reduces friction and helps customers complete their orders faster.
More Control for Customers: Customers can easily manage their cart, adjusting quantities or removing items before finalizing their purchase, which leads to a better user experience and higher satisfaction.
Step 1: Add the Add to Cart Element to Product Pages
To allow customers to add products to their cart, you’ll need to add the Add to Cart element to your product pages.
Important
The Add to Cart element works exclusively in the Store pages. Make sure you’re editing a product page when adding this element.
Navigate to the Store app from your ClickFunnels dashboard.
Go to the Overview section and click Customize Store to open the theme editor.
In the left-hand panel, select Product from the list of site theme pages.
To add the element, click the orange Add Element button to open the Elements menu.
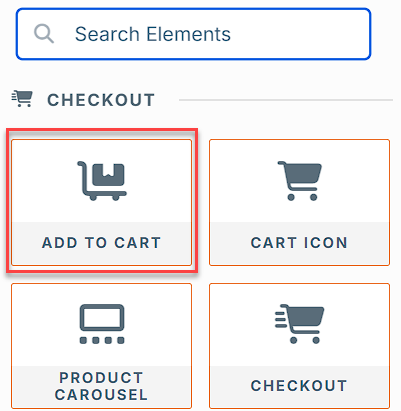
From the Elements menu, scroll down to the Checkout section and click Add to Cart to add it to the product page.

Customize the element’s appearance, such as its text (e.g., “Add to Cart”) and style (color, size, alignment), to match your store’s design.
Save your changes.
Step 2: Add the Cart Icon to Your Store
To ensure customers can easily access their cart from anywhere in the store, you’ll need to add the Cart Icon to your pages.
Important
The Cart Icon works only on the Store pages and Home page. Ensure you’re adding this element to one of these page types.
From the Store Theme Editor, select the page where you’d like to add the Cart Icon (e.g., Store front or Collection page).
Click the orange Add Element button.
From the Checkout section, choose Cart Icon.
Place it in the desired location (e.g., header).
Customize the icon’s appearance, adjusting the size, style, and alignment to match your store’s branding.
Save your changes.
Step 3: Customize the Cart Review Modal
The Cart Review Modal allows customers to view and manage the items in their cart.
From the Store Theme Editor, select the Cart page.
Click Edit Cart Settings to open the customization options.
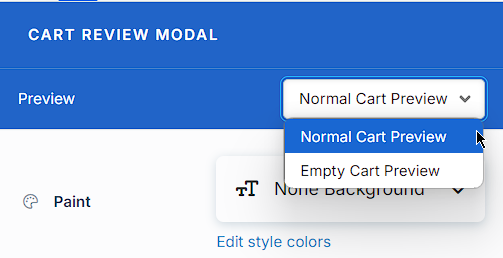
At the top, choose between Normal Cart Preview or Empty Cart Preview.

Customize the following settings as needed:
Backdrop Color and Container Color: Adjust the modal background and container colors.
Text and Font Settings: Customize the header, product names, and button text sizes and colors.
Buttons: Change size, background color, and text color for Checkout and Continue Shopping buttons.
Quantity Input: Adjust color and corner settings for the quantity selector.
Display Price Subtotals: Toggle the switch if you want to show subtotals in the cart.
After making changes, click Save to apply them.
Step 4: Set Up the Checkout Page
After customers click the Cart Icon, they will first see the Cart Review Modal, where they can review their items, adjust quantities, and proceed to checkout.
To customize the Checkout Page, follow these steps:
In the Store Theme Editor, select the Checkout page from the Site Theme Pages list.
Ensure the following elements are included:
Order Summary: Displays the products, subtotal, taxes, and order details.
Checkout: Allows customers to enter their shipping and payment details.
Do not use the Checkout Legacy element, as it is not compatible with the new cart functionality.
Customize the layout and design to match your store’s branding.
Click Save to apply your changes.
Step 5: Test the Cart and Checkout Process
Before making your store live, it’s important to test the cart and checkout process to ensure everything works smoothly.
From the Store Overview dashboard, cick the gear ⚙️ icon next to your store name to open the settings.
Scroll to the Visibility section and convert your store to Draft.

Open your store in an incognito window and add the parameter
?preview=trueto the store URL to test as a customer.Add a product to the cart by clicking the Add to Cart button.
Click the Cart icon to review the products in the cart. Test:
Adding and removing products.
Adjusting product quantities.
Ensuring the subtotal is calculated correctly.
Proceed to the Checkout Page and complete a test transaction using Test Mode.
On the checkout page, complete the checkout details. Use the test credit card number
4111 1111 1111 1111with any valid expiration date and CVV to complete the test checkout.