The “Tag Contact” step in ClickFunnels workflows is a powerful feature that allows you to apply or remove tags to/from your contacts automatically. Tags are essential for segmenting your audience, managing contact lists, and triggering specific actions based on the behavior or attributes of your contacts. In this article, we will guide you through the process of adding and configuring the “Tag Contact” step in your workflows, enabling you to streamline your automation processes and improve your marketing efficiency.

Requirements
An active ClickFunnels account
Adding the “Tag Contact” Step to Your Workflow
Open Your Workflow:
From your ClickFunnels dashboard, navigate to the Automations » Workflows menu.
Open an existing workflow or create a new one.
Add the “Tag Contact” Step:
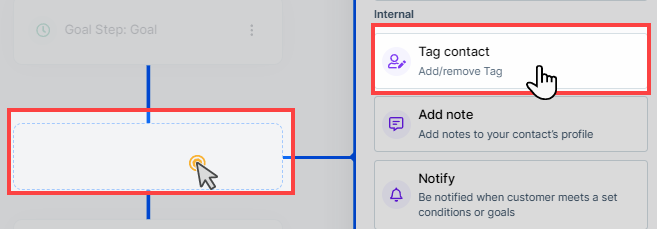
Click on the Plus Icon (+) in your workflow editor.
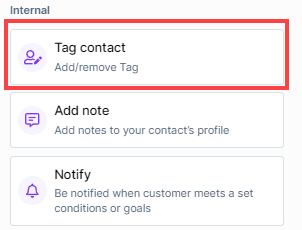
In the right-hand panel, select the “Tag Contact” option under the “Internal” category.

Configuring the “Tag Contact” Step
Once you’ve added the “Tag Contact” step to your workflow, follow these steps to configure it:
Select Action Type:
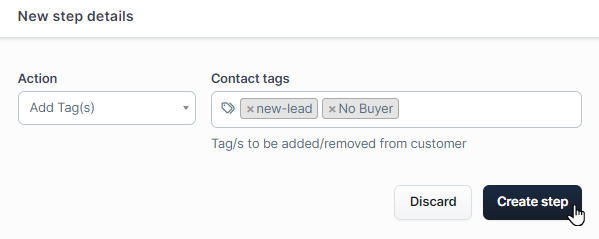
In the configuration window, choose whether you want to Add Tag(s) or Remove Tag(s) from the contact in the “Action” field.
Choose the Tags:
After selecting the action type, select the tag(s) you want to add or remove. You can add multiple tags by typing each tag name and selecting it from the dropdown menu. If the tag does not exist in the dropdown list, you can simply type the name and press the “Enter” button to create as a new tag.

Save Your Settings:
Once you’ve configured the action and selected the tags, click the Create Step button to save your settings and return to the workflow editor.
Practical Use Cases
The “Tag Contact” step is highly effective in a variety of scenarios:
Segmentation: Automatically tag contacts based on their behavior, such as visiting a specific page or completing a purchase, allowing you to target them more effectively in future campaigns.
Dynamic Content Delivery: Use tags to segment your audience and deliver personalized content that resonates with different segments of your audience.
Automation Triggers: Apply tags that can be used as triggers for other workflows, ensuring that your contacts move through the correct automation sequences based on their interactions.
Best Practices for Using Tags
When using the “Tag Contact” step, it’s essential to keep a few things in mind:
Tag Naming Conventions: To keep your tags organized, consider establishing a naming convention that is easy to understand and consistent across your workflows. For example, you might use tags like
buyer-ProductNamefor purchasers orlead-OfferNamefor new leads. This helps you quickly identify the purpose of each tag and maintain a well-structured system.Avoid Over-Tagging: While tags are a powerful tool, over-tagging can lead to complexity and confusion. Use tags strategically to keep your contact lists organized and your workflows efficient.
Tag Removal: If you’re using tags to trigger other workflows or actions, be cautious when removing tags, as this could inadvertently stop or change the flow of your automation sequences.